
So-called "data spaces" (or data rooms) are the key concept for a large-scale, transnational data economy. This is also what the Gaia-X initiative for a data infrastructure in Europe envisages. The International Data Space Association (IDSA) plays a major role in providing the architecture model, interfaces and standards. One example of this is the data space introduced under the project name "Catena-X", which is intended to represent the data economy of the automotive industry. Data spaces communicate via standardized connectors. The Eclipse Data Space Connector (EDC) is a standard and guideline-compliant connector that can be used in the context of Catena-X, but also generally as a connector for data spaces.
In this blog post, we take a closer look at EDC. The aim is to gain a better understanding of the connector and establish communication with it.
Sources of information on the Eclipse Data Space Connector
A good Overview on the EDC project can be found on the Eclipse Foundation (https://projects.eclipse.org/projects/technology.dataspaceconnector). A project overview can be found on this page. Basic questions about the EDC project can be answered here.
The Technical concept of the Eclipse Data Space Connector is clearly laid out by the Catena-X project on one page and offers clear illustrations of the structure and function of the EDC connector: https://catena-x.net/en/angebote/edc-die-zentrale-komponente-fuer-die
As open source software, the Source code of the EDC is publicly available. This can be viewed in the form of a project on Github: [https://github.com/eclipse-dataspaceconnector/DataSpaceConnector]. The project directory contains several instruction files that are intended to inform the reader about the technical components, functionality and application.
There is also a helpful website (https://eclipse-dataspaceconnector.github.io/docs/#/) which explains all the components of the EDC, includes related documents (e.g. publications) and a "Getting Started" guide. If you want to understand the EDC and develop with it, you should definitely go through the "hands-on" examples.
Hands-On - Cloning, building, running the Eclipse Data Space Connector on the local machine
To go through the hands-on examples, the source code of the EDC project [https://github.com/eclipse-dataspaceconnector/DataSpaceConnector] is cloned from Github into your own local development environment:
git clone https://github.com/eclipse-dataspaceconnector/DataSpaceConnector.git
If the project is not completely cloned into the local project, it is most likely because a configuration in git rejects the cloning of project files with a longer file name. The restriction can be lifted with the following console command:
git config –system.core.longpaths true
The project can be opened with the command "./gradlew clean build" build. This process takes a few minutes and it is possible that errors may still occur in the final construction steps (tests fail). The Eclipse Data Space Connector is still under development. For test purposes, we start the build process with the command "./gradlew -continue" continue. The build process should be completed successfully.
To verify the function of the connector, we start it with the following command:
java -jar launchers/ids-connector/build/libs/dataspace-connector.jar
As soon as "Datspace Connector ready" is displayed in the console, it can be assumed that the connector has been installed correctly. This connector is not yet functional. Extensions are used to provide the EDC with an interface in this hands-on. To do this, we first take a look at the folder structure. This provides an overview of the project.
EDC - folder structure
The project is divided into several subdirectories. The most important directories are explained below:
spi
This is the primary extension point for the connector. It contains all the necessary interfaces that need to be implemented, as well as essential model classes and enums. Basically, the spi modules define the extent to which users can adapt and extend the code.
core
This directory contains all the absolutely essential modules that are required to operate a connector, such as TransferProcessManager, ProvisionManager, DataFlowManager, various model classes, the protocol engine and the policy part. It is possible to create a connector using only the code of the core module. However, this limits the possibilities for communication with Data Spaces.
Extensions
This subdirectory contains code that extends the core functionality of the connector with technology- or cloud-provider-specific code. For example, a transfer process storage based on Azure CosmosDB, a secure vault based on Azure KeyVault, etc. Technology- and cloud-specific implementations should take place here.
launchers
Launchers are essentially connector packages that are executable. Which modules are included in the build (and therefore: which capabilities a connector has) is defined by the build.gradle.kts file in the launcher subdirectory.
data-protocols
Contains implementations for communication protocols that a connector could use, such as IDS.
samples
Contains code that demonstrates how the connector can be used in different scenarios. For example, it shows how to run a connector from a unit test to quickly test functionality, or how to implement an outward-facing REST API for a connector. [https://github.com/eclipse-dataspaceconnector/DataSpaceConnector]
EDC extension by an interface with an extension
In this example, a REST interface is added to the connector. This responds to incoming requests with a user-defined response message (e.g. "Hello World!").
The EDC was developed with great consideration for extensibility. This makes it possible to create a Java sub-project in the Extension sub-directory and execute it with the connector. This allows connections to be established to any database.
First, a module is created in the path "../extensions/common/":

In this example, the module is called "myrest" called. In the process Gradle selected as a build management tool and in the language Kotlin defined. EDC requires at least the Version 11 for Java.
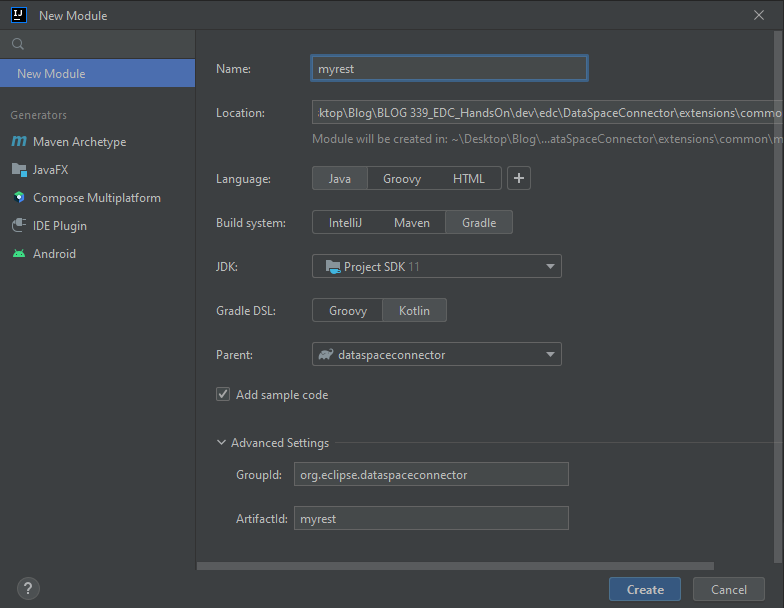
The created directory must be revised so that it is recognized as an extension by the overlying connector project.
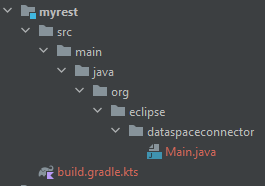
First the build.gradle.kts is set up. Necessary dependencies to the connector are included here. In addition Jakarta is added to build the REST controller. The name for the executable connector is defined in the last line. The build.gradle.kts file should look like this:
build.gradle.kts
plugins {
    `java-library`
    id("application")
    id("com.github.johnrengelman.shadow") version "7.1.2"
}

val rsApi: String by project

dependencies {
    implementation(project(":core:control-plane:control-plane-core"))

    implementation(project(":extensions:common:http"))

    implementation("jakarta.ws.rs:jakarta.ws.rs-api:${rsApi}")
}

application {
    mainClass.set(

        "org.eclipse.dataspaceconnector.boot.system.runtime.BaseRuntime")
}

tasks.withType<com.github.jengelman.gradle.plugins.shadow.tasks.ShadowJar> {
    exclude("**/pom.properties", "**/pom.xm")
    mergeServiceFiles()
    archiveFileName.set("connector-myrest.jar")
}
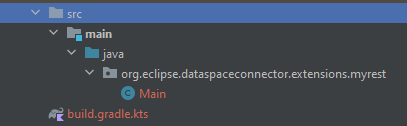
Instead of the automatically created Main.java class, two new ones are created. The first class is required when creating an extension for EDC. In this example, we call this "MyrestEndpointExtension". This must be the interface "ServiceExtension" of the EDC so that the extension is included by the connector. This injects a web service into the connector. The web service is defined later with the second class "MyrestApiController". The class MyrestEndpointExtension looks as follows:
MyrestEndpointExtension.java
package org.eclipse.dataspaceconnector.extensions.myrest;

import org.eclipse.dataspaceconnector.runtime.metamodel.annotation.Inject;
import org.eclipse.dataspaceconnector.spi.WebService;
import org.eclipse.dataspaceconnector.spi.system.ServiceExtension;
import org.eclipse.dataspaceconnector.spi.system.ServiceExtensionContext;

public class MyrestEndpointExtension implements ServiceExtension {

    @Inject
    WebService webService;

    @Override
    public void initialize(ServiceExtensionContext context) {
        webService.registerResource(

               new org.eclipse.dataspaceconnector.extensions.myrest

                       .MyrestApiController(context.getMonitor()));
    }
}
The second class MyrestApiController defines the functions of the REST interface. With Jakarta, we create a simple interface to greet the requester. The EDC-side logger is used to signal an incoming request. The class looks like this:
MyrestApiController.java
package org.eclipse.dataspaceconnector.extensions.myrest;

import jakarta.ws.rs.Consumes;
import jakarta.ws.rs.GET;
import jakarta.ws.rs.Path;
import jakarta.ws.rs.Produces;
import jakarta.ws.rs.core.MediaType;
import org.eclipse.dataspaceconnector.spi.monitor.Monitor;


@Consumes({MediaType.APPLICATION_JSON})
@Produces({MediaType.APPLICATION_JSON})
@Path("/")
public class MyrestApiController {
    private final Monitor monitor;

    public MyrestApiController(Monitor monitor) {
        this.monitor = monitor;
    }

    @GET
    @Path("doubleslash")
    public String checkHealth() {
        monitor.info("Received GET Request");
        return "{\"response\":\"Welcome, I'm alive at doubleSlash!\"}";
    }
}
After creation, the extension must be registered in a form prescribed by EDC. This is achieved by creating the following structure under the "main" package. It is important to note that the structure exactly as in the following image section must be created and named (resources/META_INF/services/...):
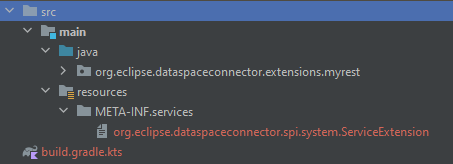
A file with the name from the section (org.eclipse...) must be created within the "services" folder. The content consists of a line of text. This is the path to the "MyrestEndpointExtension" class:

The extension has now been created and registered with the connector.
Testing the developed interface on the connector
The entire DataSpace project can now be built. The added extension is also built. To do this, we open the Gradle window, navigate to "dataspaceconnector/extensions/myrest/common/myres/Tasks/build/" and double-click on "clean" to clean up the extension from existing build files. Afterwards, the "build" command can be executed. A build folder now appears within the "myrest" extension folder:
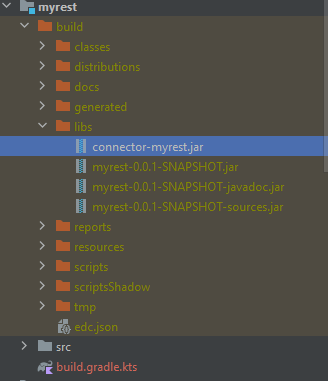
This contains the end product of the extension. Now we can execute the connector with the following command:


By default, the server is installed locally on the Port 8181 executed. We can now access this in the browser:
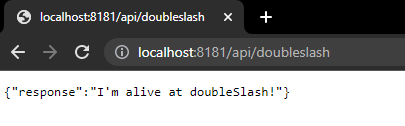
The example for the REST interface shows how, for example, a data source can also be connected to the connector. The connector already offers several functions that make this easier. For example, an integrated SQL package can be used to connect SQL databases. It is even easier with a suitable extension. Within the project there is already a PostgresQL-extension, which can be used to set up the connection. Cloud solutions are also already supported. The Cloud Provider Azure and AWS can also be found in the existing extensions. README instructions can always be found within the extension, which make it easier to connect to the cloud.
Conclusion
It is important to mention that the EDC is still under development. Therefore, there were isolated errors when creating the REST interface, some of which were due to the configuration of the development environment and the tools. Fortunately, these can be rectified quickly. However, this is not user-friendly. There is hardly anything to be found when searching for solutions to errors using the Internet, as working with the EDC is currently a new topic.
On the other hand, the EDC project offers good information material and many instructions on how to use the connector correctly. The four examples are very helpful (samples) that are included in the project. These range from running a connector to connecting to a cloud. In addition, several instructions are distributed in the project. These are intended to explain and explain the respective function and use of the subdirectory.