

When onboarding becomes hard work
You know how it is: a new IoT device is about to be launched—but before it can say „hello cloud,“ you need configuration, keys, a target hub, and nerves of steel. With five devices, that's no problem. With 5,000, it becomes a test of patience.
This is where Azure DPS comes in.
The Device Provisioning Service takes care of this tedious work for you: Automated, secure, and scalable. Instead of manual effort, DPS ensures that every new device registers itself—without any paperwork or misconfigurations.
But before we dive deeper, let's first clarify what DPS actually does.
Azure DPS explained: How your device autopilot works
Azure DPS is the Autopilot for IoT devices. It ensures that every new device is automatically assigned to the correct IoT Hub when it is first switched on—without prior knowledge, manual intervention, or special configurations.
- Without DPS: Each device must be preconfigured manually—this is error-prone, time-consuming, and hardly scalable.
- With DPS: Devices connect only to the central service. DPS automatically handles secure registration and hub assignment.
In shortDPS is your digital reception robot—it welcomes every new device and sends it directly to the right place in the network.
But now the question arises: How do the devices actually identify themselves? This is precisely where certificates come into play.
Why X.509 certificates make your IoT more secure and smarter
Why certificates? Wouldn't simple access keys be easier?
Not really—keys are like Front door key under the doormat: quickly distributed, easy to copy, and insecure. Certificates, on the other hand, are the digital identification of your devices – difficult to forge and with clear rules for validation and administration.
The most important advantages at a glance:
- Security: Private keys never leave the device—sensitive data remains protected.
- Scalability: A single root certificate can manage millions of devices.
- Standard compatibility: Supports common security standards such as PKI, HSM, TPM.
- Automation: Devices are already prepared for onboarding at the factory with a „birth certificate.“.
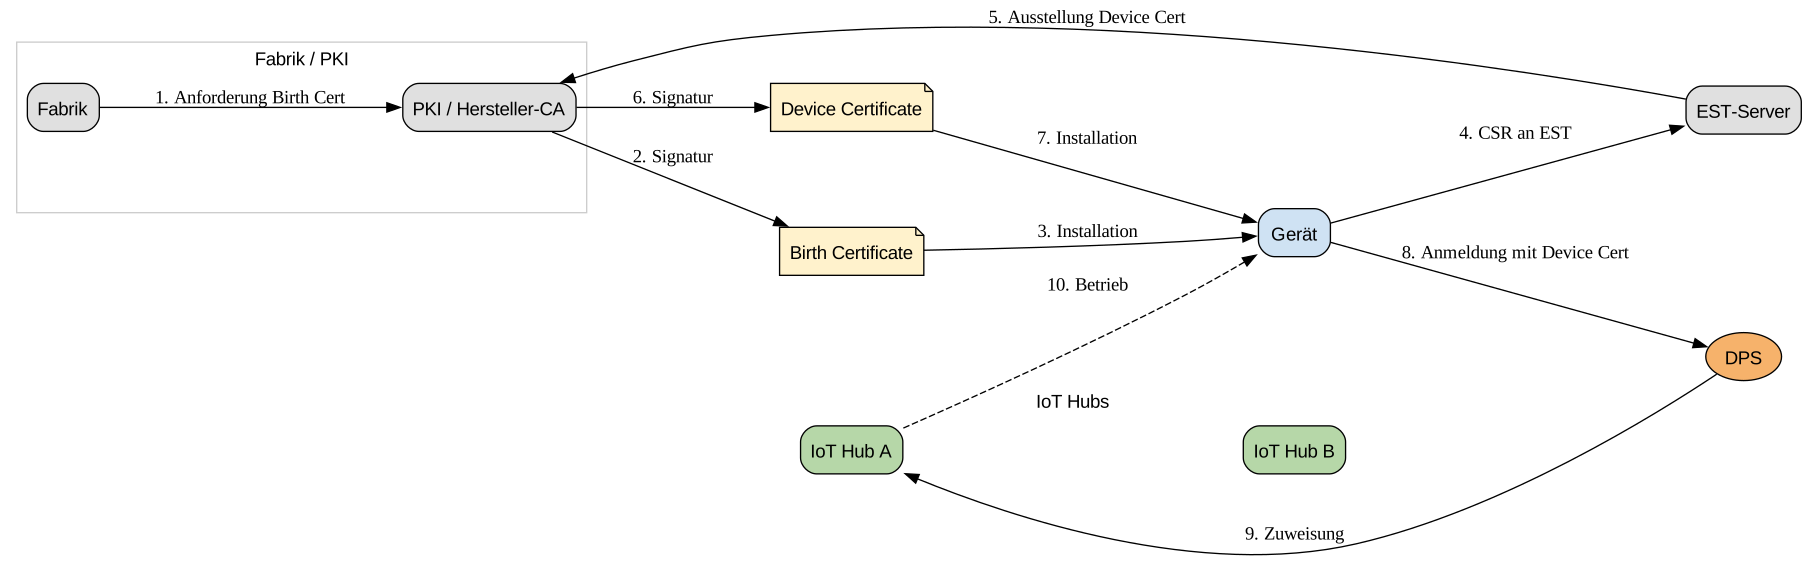
7 steps to certification: How to get your device safely into the cloud
- factoryThe device is manufactured and receives a „birth certificate.“.
- InstallationThis certificate is stored permanently in the device—ready for its first use.
- online launchThe device goes online for the first time and sends a certificate signing request (CSR) via the EST standard.
- PKI exhibitionThe certification authority (PKI) checks the request and issues a valid device certificate.
- returnThe new device certificate is returned to the device and stored there securely.
- RegistrationThe device uses this certificate to securely authenticate itself with Azure DPS.
- allocationDPS verifies the certificate and automatically assigns the device to the appropriate IoT Hub.
Symmetric keys, TPM, and more: These authentication methods are still available
In addition to X.509 certificates, Azure IoT offers other options for device authentication, each with its own advantages and limitations:
- Symmetric keys
Imagine if every device simply had a password. Quick to set up, but highly risky in the event of theft or copying—then the floodgates are open. Ideal for tests or prototypes, unsuitable for large, productive fleets.
- TPM (Trusted Platform Module)
A hardware chip in the device stores keys extremely securely—practically impossible to read. Maximum security, but only usable if the hardware supports TPM.
- X.509 certificates
The „official ID“ for your devices. Once set up, they enable scalable, automated, and secure onboarding. Standardized, flexible, and future-proof—but a little more complex to set up.
In summary:
- Keys = simple, but insecure
- TPM = secure, but hardware-dependent
- Certificates = ideal for large fleets and long-term solutions
And for these certificates to be effective in practice, we need a clever setup in the DPS: the so-called Enrollment Groups.
How to set up an enrollment group with certificates correctly
Instead of registering each device individually, you can work efficiently in Azure DPS with two types of enrollments:
- Individual enrollment → Ideal for testing or individual devices.
- Enrollment Group → Perfect for fleets that rely on a common certificate.
This is how the enrollment group works:
- You upload a root or intermediate certificate to DPS.
- Devices with appropriate certificates connect to the DPS upon startup.
- DPS checks the certificate and automatically assigns the device to the appropriate IoT Hub.
It's like a VIP wristband at a festivalThose who have the correct certificate are automatically admitted—security (DPS) only briefly checks to see if it is genuine.
But what if you want to distribute devices by region, customer, or production batch?
Then here's a smart trick that can help:
You can store information such as serial numbers directly in the certificate—in a subject or an extension.
With Custom Allocation Policies You can extend DPS so that it assigns devices based on rules, e.g., „Devices with serial numbers 1000–1999 → Hub A, all others → Hub B.“
The result: Certificates not only provide security—they also enable automatic, intelligent distribution of your devices across different IoT hubs.
So that certificates are not only used for authentication, but also for automatic distribution can be used, can be Store additional information directly in the certificate subject. – for example, the device family or serial number.
A typical field for this is CN (Common Name). This is often used for names or serial numbers and is ideal for automatically sorting devices according to Families or serial number ranges assign to different IoT hubs.
To give you an idea of how this might look in practice, here is a Simplified example in C#:
Code example for allocation rules
// Azure Function - DPS Custom Allocation (simplified)

// Assume we already extracted the certificate subject, e.g.:
// CN=SensorFamilyA-12345, O=MyCompany, C=DE
string subject = "<subject from x509CertificateInfo>";
string chosenHub;

// --- Extract family and serial number from CN ---
string cn = subject.Split(',')
                   .FirstOrDefault(p => p.Trim().StartsWith("CN="))
                   ?.Substring(3).Trim();

// Example CN looks like: "SensorFamilyA-12345"
string family = cn?.Split('-')[0];   // "SensorFamilyA"
string serial = cn?.Split('-')[1];   // "12345"

// --- Allocation Rule 1: Route by device family (from CN) ---
if (family == "SensorFamilyA")
    chosenHub = "iothub-a.azure-devices.net";
else if (family == "SensorFamilyB")
    chosenHub = "iothub-b.azure-devices.net";

// --- Allocation Rule 2: Route by serial number range (override or complement) ---
// Example: 1000–1999 -> Hub A, 2000–2999 -> Hub B, else -> Hub C
if (int.TryParse(serial, out var sn))
{
    if (sn >= 1000 && sn <= 1999)       chosenHub = "iothub-a.azure-devices.net";
    else if (sn >= 2000 && sn <= 2999)  chosenHub = "iothub-b.azure-devices.net";
    else                                chosenHub = "iothub-c.azure-devices.net";
}


// ... return chosenHub back to DPS in the response ...
This allows devices to be without any manual intervention Distribute to the appropriate IoT hubs based on rules.
However, for many scenarios, it is sufficient to, Each device family with its own certificate and thus its own Enrollment Group Only if you want to make finer distinctions within a family—for example, by serial number or operating environment—is it worth using a Custom Allocation Policy via Azure Function.
But what does the entire journey of a device from the factory to the cloud actually look like?
Automatically provision devices: The journey from the factory to the IoT Hub
The path of an IoT device to the cloud follows a clearly defined process – Step by step:
- Factory: The device receives its first „birth certificate.“.
- Delivery: It goes to the customer—without yet knowing which IoT Hub it will use later.
- First launch in the field: When switched on, the device connects to the DPS (global.azure-devices-provisioning.net).
- Provisioning: DPS checks the certificate and automatically assigns the device to the appropriate IoT Hub.
- Operation: From this moment on, the device only communicates with „its“ hub – securely, reliably, and without manual intervention.
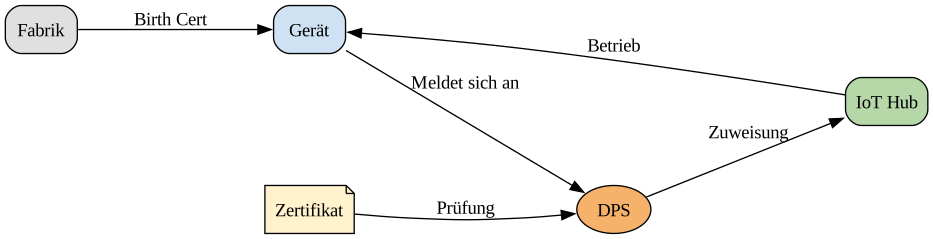
Basically like a Check-in at the airportShow your boarding pass, get assigned a gate, and off you go.
However, to ensure that everything works reliably and securely, a few rules and best practices are necessary.
How to keep your IoT setup secure: Best practices & protective measures
As convenient as automated device onboarding with DPS is— Safety remains the linchpin. To ensure that your setup runs reliably and securely, you should follow a few basic rules:
- Protecting the certificate chain: Always store and manage root and intermediate certificates securely.
- Schedule rotation: Renew certificates in good time before they expire.
- Use revocation: Immediately block compromised device certificates to prevent misuse.
- Hardware protection: Private keys belong exclusively in secure hardware such as HSM or TPM.
- Keep monitoring active: Test enrollment processes regularly and keep an eye on logs.
Conclusion: Automated device onboarding—secure, scalable, clean
With Azure DPS and X.509 certificates, device onboarding goes from being a time-consuming, error-prone task to a automated routine with maximum security.
For companies, this means in concrete terms:
- Greater security through PKI-based authentication.
- Greater scalability for large fleets of IoT devices.
- Greater efficiency thanks to automated workflows.
In short: instead of hard work and sources of error, there is a Clean onboarding on autopilot – and you have more time to focus on innovation and new use cases.
Sources:
- X.509 certificate attestation with Azure DPS (Microsoft)
- Security practices for Azure IoT device manufacturers (Microsoft)
- Tutorial: Provision X.509 devices using Enrollment Groups (Microsoft)
- Roll X.509 certificates in DPS (Microsoft)
- EST – Enrollment over Secure Transport (DigiCert)
- Automatic IoT Edge Certificate Management with GlobalSign EST (Microsoft / GlobalSign)